 Pretty much the only reason why I chose to go to grad school in Vermont. Click the picture for a bigger version.


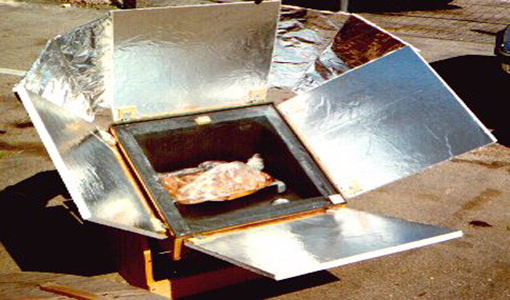
We got a great response to our post “Cheap “Sun in a Box” Solar Cooker Wins Climate Change Prize” from earlier today. It seems a lot of people are into solar oven cooking!
We also got a lot of inquiries about how you can build your own solar oven. It just so happens we have detailed, step-by-step instructions on hand. And so, due to popular demand, here’s your guide to constructing your very own cheap and simple solar box cooker.
The following is an excerpt from The Carbon-Free Home: 36 Remodeling Projects to Help Kick the Fossil-Fuel Habit by Stephen and Rebekah Hren. It has been adapted for the Web. (All drawings are by Rebekah Hren, adapted with permission from Solar Cookers International.)
Renter friendly.
Project Time: Afternoon.
Cost: Inexpensive ($5–20).
Energy Saved: Low. Cooking’s relatively low energy requirements (4 percent of average energy budget) and solar cooking’s intermittent availability make dependence on at least one other cooking system all but certain.
Ease of Use: Moderate. Cooking can be done only on relatively sunny days and works better in summer than in winter.
Maintenance Level: Medium. How long this solar oven lasts depends on how well you take care of it. If it gets wet repeatedly, it will eventually turn to mush, so bring it inside when it’s not in use.
Skill Levels: Carpentry: Basic.
Materials: Two large, shallow cardboard boxes—the inner box should be at least 18 x 22 inches, preferably just a little bit taller than your pots; the outer box should be a little larger in all dimensions so there is at least 1–2 inches of space between the two boxes when they are nested. You’ll also need corrugated cardboard at least 6 inches longer and wider than the outer box to make the lid; window glass (or Plexiglas) at least 20 x 24 inches and longer and wider than the inner box by 2 to 3 inches; a thin, black metal sheet, sized equal to or slightly smaller than the inner box; 50 feet of aluminum foil; dry plant fibers such as leaves or straw or at least 50 sheets of newspaper, quartered and crumbled; glue silicone caulk; and rigid wire (hanger wire, for instance).
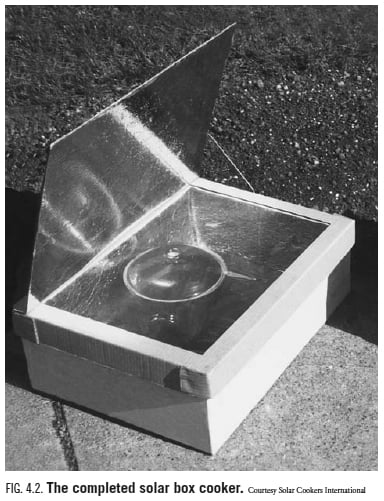
Tools: Paintbrush, utility or other knife, pencil, straightedge.
Caution: Solar cookers, especially parabolic varieties like the CooKit (described next), have the potential to cause retinal damage from the concentrated solar rays. Be careful to avoid looking at the bright reflections from any of these solar cookers.
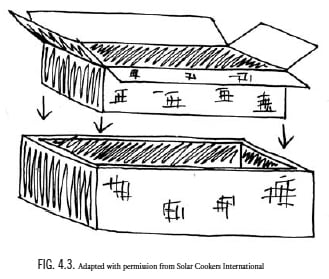
Cut the window opening in the outer box. See figure 4.3. Turn the outer box upside down. On its bottom, center the inner box and draw a line around it. Cut out this piece to make a window opening the same size as the inner box. There should be a small rim on all four sides, 2–3 inches wide. On the lid piece— the extra piece of cardboard—center the outer box and trace around it (these are the fold lines). Extend these lines out to the edges of the lid piece. Center the inner box between the fold lines on the lid (that you just drew) and trace around this box as well. Cut only three sides of the inner line, two short sides and one long one. Fold up the resulting flap for the reflector, creating a window frame opening the same size as the inner box.
Adjust the height of boxes, if needed. See figure 4.4 Set a cooking pot next to both boxes. The inner box needs to be just a little taller than your pot. The outer box needs to be just a little taller than the inner box. If the boxes are too tall:
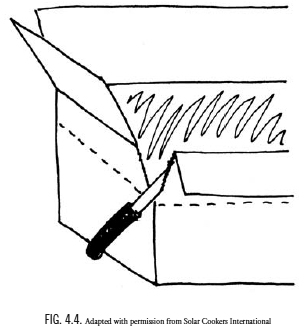
On the inner box make a mark about 1 inch above the top of the pot and draw a fold line at this height straight around the four box walls. Score the fold lines with a blunt edge such as a spoon handle.
On the outer box make a mark about 2 inches above the top of the pot and draw a fold line at this height straight around the four box walls. Score the fold lines with a blunt edge such as a spoon handle.
Cut the corners of both boxes down to the fold lines. Fold the sides outward along the creases.
Trim the inner box flaps. When the walls of the inner box are folded down to the right height (or if you didn’t need any adjustments), trim the flaps to make them as narrow as the small rim around the window opening on the outer box (refer to the first step if necessary).
Join the boxes. See figure 4.5. Turn the outer box right side up, so the window opening and rim are down. Spread glue on the inside of the rim. Turn the inner box upside down and lower it into the outer box, onto the glue. Press the small flaps against the inside of the rim around the window opening to join the two boxes into one double-walled box, now open at the bottom (which should be facing up at this point).
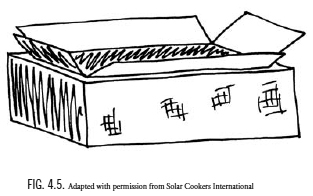
Insulate and seal. Without disturbing the drying glue, carefully spot-glue aluminum foil on all four walls and the underside of the inner box, covering all surfaces between the two boxes. This layer of foil helps insulate the cooker. Lightly fill the gaps between the two boxes with crumpled newspaper, plant fiber, or other insulation. Add a few strips of cardboard and more crumpled newspaper or other insulation on the underside of the inner box (which should be facing up at this point). Close and glue the flaps of the outer box to seal the bottom of the cooker.
Glue foil inside the box and lid. Turn the box right side up. Dilute glue 1:1 with water and, using a paintbrush, spread it thinly on the dull side of sheets of aluminum foil. Press the glued sheets of aluminum foil tightly and smoothly like wallpaper to the inside and rim of the box. A few wrinkles won’t hurt. Set the box aside to dry. Repeating the procedure, glue foil to the underside of the lid flap (the folded-up center part only).
Cut, fold, and glue the corners of the new lid. See figure 4.6. With the lid upside down (foil facing up), make one cut at each of the four lid corners, just to the first fold lines. (The cuts should be parallel to the long side of the lid.) Score all fold lines with a blunt edge and fold along the creases with a straightedge such as a board. Overlap and glue the corners, and secure them with clothespins or clamps until the glue is dry. To make quick clamps, cut cardboard-width slits in a small stack of cardboard pieces.
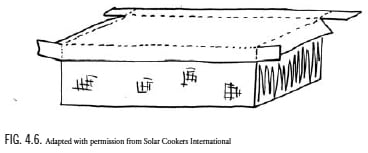
Insert the window. Spread silicone caulk along the underside edge of the window opening rim (outside the cut edge of the foiled reflector piece), then press the glass in firmly but carefully to make a good seal with the caulk. Let the box and lid dry overnight.
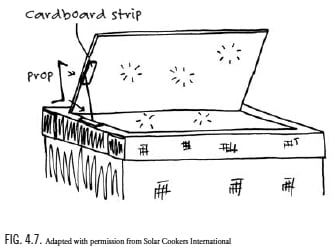
Make an adjustable prop. See figure 4.7. Make small holes in a corner of the lid reflector and the side of lid. Loop string through the holes. Make several notches in a stick and tie the stick at both ends to hold up the reflector and allow angle adjustments.
OR
Bend a sturdy wire at both ends and glue corrugated cardboard strips to the lid and reflector as shown. The wire can be inserted into any of the corrugations for angle adjustment.
Add the black tray and “cook” the cooker. Put the black metal sheet inside the box. (The pots will sit on this light-absorbing sheet.) Put on the lid, with the lid reflector propped open, and aim the cooker toward the sun for several hours to drive out the last bit of moisture and any paint or glue fumes.
Put food in dark pots. Use with dark, tight-fitting lids.
Choose a cooking location. Set the cooker on a dry, level surface in direct sunshine away from potential shadows. For best results, solar cooking requires continuous, direct sunshine throughout the cooking period.
Put the pots in the cooker and replace the lid. Put the pots in cooker. If you’re cooking multiple dishes, quicker-cooking items should be placed toward the front of the cooker (opposite the reflector) and slower-cooking items toward the back, where access to sunlight is best. Place the lid on cooker.
Orient the cooker. Orient the cooker according to the details below. Once oriented, the cooker doesn’t need to be moved again during three to four hours of cooking. For longer cooking, or for large quantities of food, reorienting the cooker every couple of hours speeds cooking a little. Food cooks fastest when the shadow created by the cooker is directly behind it.
To cook a noontime meal orient the cooker so that the front side (opposite the reflector) faces easterly, or approximately where the sun will be midmorning. In general, it is good to get the food in early and not worry about it until mealtime. For most dishes you should start cooking by 9 or 10 am.
To cook an evening meal orient the cooker so that the front side faces westerly, or approximately where the sun will be midafternoon. For most dishes, it’s best to start cooking by 1 or 2 pm.
For all-day cooking orient the cooker toward where sun will be at noon or early afternoon. The food will be ready and waiting for the evening meal.
Adjust the reflector. With the adjustable prop, angle the reflector so that maximum sunlight shines on the pots.
Leave the food to cook for several hours or until done. There is no need to stir the food while it is cooking.
Remove the pots. Using pot holders, remove the pots from the cooker. (CAUTION: Pots get very hot.) If you won’t be eating for a couple of hours, you may want to leave the pots in the cooker and close the lid. The insulative properties of the cooker will keep the food warm for a while.
Enjoy!
Store your cooker away from rain and animals, preferably indoors. Keep the glass clean.
 Since I didn't get a job this summer (which I like to pretend was my choice, but is largely attributed to other college students pushing me out, a short span of time to actually work, and a largely shitty economy, thanks to our wondrous president), I've been beginning work on my senior thesis, studying for the GRE's (which is immensely frustrating when your GRE book has incorrect answers in it), and attempting to be a domestic goddess.
 Macaroni and Cheese and Hot Dogs
 Posts
All Comments
Posts
All Comments


