
Monday, June 29, 2009
Thursday, June 11, 2009
Tuesday, June 9, 2009
I like working with kids, until they run through my yard
 I have limited internet access this week before my wireless is set up on Monday, so unfortunately I can't update much on the new house yet.
Right now, the most pressing issue is that a bunch of neighborhood kids have taken to running through my yard. There are two boys, both about 14, one on a bike and one running. They know they're not supposed to cut through, because my landlord has explicitly yelled to them that she's going to have them arrested (she's fantastic). I've yelled at them a few times myself, but it doesn't seem to help.
I have two ideas that I need input on.
Put a spike strip across my yard. May be an issue for the runner, but it will help with the kid on the bike.

Put a clothes line across the yard.
 (The kid doesn't actually wear a storm trooper costume, but this is the best picture I could find to explain it)
I may have to resort to the clothes line because I'm having trouble finding a spike strip. Thoughts?
Friday, June 5, 2009
I'm in Vermont now, looking for a place. For those of you who aren't familiar with housing lingo, I thought I'd put together an abbreviated glossary.
| If it says... | It means... |
| Cozy | Small |
| Cute | Small |
| Charming | Small |
| Small | Really small |
| On busline | Absurdly far away from town |
| Walking distance to town | Crappy place, likely a frat house |
| Sunny | There's not much else going for it |
| Heat not included | Heat is really expensive |
| No picture of the house | House is awful |
| Email me for more details | You'll never hear from me again |
Monday, April 20, 2009
Ways to let everyone know that you're a prospective student
 Ways to let everyone know that you're a prospective student
- Use a tray at Commons and take one separate plate for each type of food
- Walk five people abreast on Martin's Way, preferably as slow as possible
- Stop at random buildings and observe them thoughtfully, even things like the pump house or the carriage building
- Look around alertly, especially at things no one else notices, like the tops of buildings, squirrels, and the bronze map.
- Be completely stunned or appalled when the streakers come through
- Act extremely excited and engaged in the 8:30am statistics class you attend
- Act like you know where you're going and that you're really cool, even though your outfit, attitude, and accessories completely give you away (see below)
- Carry a blue folder, walk with your parents, be completely clean-shaven, be energetic and alert, and wear a freshly pressed button-down shirt
Tuesday, April 14, 2009
Beer and Life Choices


Friday, April 10, 2009
Fun Things I want to do with Amanda when we live together #1

Since my significant other is giving me a bit of a shove to start posting, I'm starting a fun new series on this blog. It's called...well...you probably already figured it out. And in honor of spring and the prospects of a sunny summer, here's something I want to build once we finally live together.
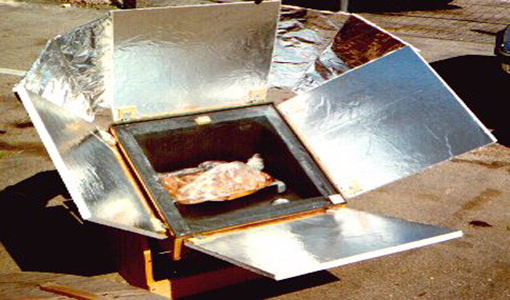
Weekend Project: How to Build Your Own Cheap, Simple Solar Oven
Categories: Green Building, Simple Living
Posted on Friday, April 10th, 2009 at 4:05 pm by dpacheco
We got a great response to our post “Cheap “Sun in a Box” Solar Cooker Wins Climate Change Prize” from earlier today. It seems a lot of people are into solar oven cooking!
We also got a lot of inquiries about how you can build your own solar oven. It just so happens we have detailed, step-by-step instructions on hand. And so, due to popular demand, here’s your guide to constructing your very own cheap and simple solar box cooker.
The following is an excerpt from The Carbon-Free Home: 36 Remodeling Projects to Help Kick the Fossil-Fuel Habit by Stephen and Rebekah Hren. It has been adapted for the Web. (All drawings are by Rebekah Hren, adapted with permission from Solar Cookers International.)
Simple Box Cooker
Renter friendly.
Project Time: Afternoon.
Cost: Inexpensive ($5–20).
Energy Saved: Low. Cooking’s relatively low energy requirements (4 percent of average energy budget) and solar cooking’s intermittent availability make dependence on at least one other cooking system all but certain.
Ease of Use: Moderate. Cooking can be done only on relatively sunny days and works better in summer than in winter.
Maintenance Level: Medium. How long this solar oven lasts depends on how well you take care of it. If it gets wet repeatedly, it will eventually turn to mush, so bring it inside when it’s not in use.
Skill Levels: Carpentry: Basic.
Materials: Two large, shallow cardboard boxes—the inner box should be at least 18 x 22 inches, preferably just a little bit taller than your pots; the outer box should be a little larger in all dimensions so there is at least 1–2 inches of space between the two boxes when they are nested. You’ll also need corrugated cardboard at least 6 inches longer and wider than the outer box to make the lid; window glass (or Plexiglas) at least 20 x 24 inches and longer and wider than the inner box by 2 to 3 inches; a thin, black metal sheet, sized equal to or slightly smaller than the inner box; 50 feet of aluminum foil; dry plant fibers such as leaves or straw or at least 50 sheets of newspaper, quartered and crumbled; glue silicone caulk; and rigid wire (hanger wire, for instance).

Tools: Paintbrush, utility or other knife, pencil, straightedge.
Caution: Solar cookers, especially parabolic varieties like the CooKit (described next), have the potential to cause retinal damage from the concentrated solar rays. Be careful to avoid looking at the bright reflections from any of these solar cookers.
Construction Steps
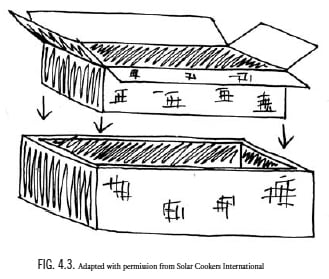
Cut the window opening in the outer box. See figure 4.3. Turn the outer box upside down. On its bottom, center the inner box and draw a line around it. Cut out this piece to make a window opening the same size as the inner box. There should be a small rim on all four sides, 2–3 inches wide. On the lid piece— the extra piece of cardboard—center the outer box and trace around it (these are the fold lines). Extend these lines out to the edges of the lid piece. Center the inner box between the fold lines on the lid (that you just drew) and trace around this box as well. Cut only three sides of the inner line, two short sides and one long one. Fold up the resulting flap for the reflector, creating a window frame opening the same size as the inner box.
Adjust the height of boxes, if needed. See figure 4.4 Set a cooking pot next to both boxes. The inner box needs to be just a little taller than your pot. The outer box needs to be just a little taller than the inner box. If the boxes are too tall:
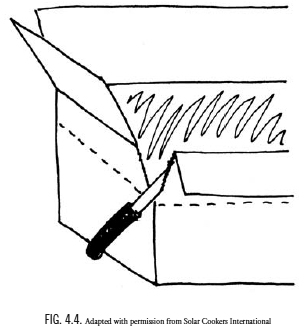
On the inner box make a mark about 1 inch above the top of the pot and draw a fold line at this height straight around the four box walls. Score the fold lines with a blunt edge such as a spoon handle.
On the outer box make a mark about 2 inches above the top of the pot and draw a fold line at this height straight around the four box walls. Score the fold lines with a blunt edge such as a spoon handle.
Cut the corners of both boxes down to the fold lines. Fold the sides outward along the creases.
Trim the inner box flaps. When the walls of the inner box are folded down to the right height (or if you didn’t need any adjustments), trim the flaps to make them as narrow as the small rim around the window opening on the outer box (refer to the first step if necessary).
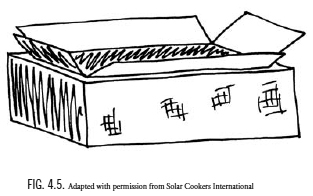
Join the boxes. See figure 4.5. Turn the outer box right side up, so the window opening and rim are down. Spread glue on the inside of the rim. Turn the inner box upside down and lower it into the outer box, onto the glue. Press the small flaps against the inside of the rim around the window opening to join the two boxes into one double-walled box, now open at the bottom (which should be facing up at this point).
Insulate and seal. Without disturbing the drying glue, carefully spot-glue aluminum foil on all four walls and the underside of the inner box, covering all surfaces between the two boxes. This layer of foil helps insulate the cooker. Lightly fill the gaps between the two boxes with crumpled newspaper, plant fiber, or other insulation. Add a few strips of cardboard and more crumpled newspaper or other insulation on the underside of the inner box (which should be facing up at this point). Close and glue the flaps of the outer box to seal the bottom of the cooker.
Glue foil inside the box and lid. Turn the box right side up. Dilute glue 1:1 with water and, using a paintbrush, spread it thinly on the dull side of sheets of aluminum foil. Press the glued sheets of aluminum foil tightly and smoothly like wallpaper to the inside and rim of the box. A few wrinkles won’t hurt. Set the box aside to dry. Repeating the procedure, glue foil to the underside of the lid flap (the folded-up center part only).
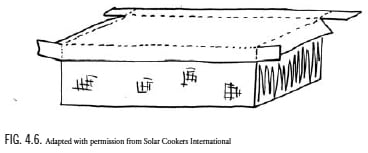
Cut, fold, and glue the corners of the new lid. See figure 4.6. With the lid upside down (foil facing up), make one cut at each of the four lid corners, just to the first fold lines. (The cuts should be parallel to the long side of the lid.) Score all fold lines with a blunt edge and fold along the creases with a straightedge such as a board. Overlap and glue the corners, and secure them with clothespins or clamps until the glue is dry. To make quick clamps, cut cardboard-width slits in a small stack of cardboard pieces.
Insert the window. Spread silicone caulk along the underside edge of the window opening rim (outside the cut edge of the foiled reflector piece), then press the glass in firmly but carefully to make a good seal with the caulk. Let the box and lid dry overnight.
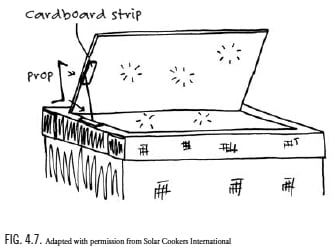
Make an adjustable prop. See figure 4.7. Make small holes in a corner of the lid reflector and the side of lid. Loop string through the holes. Make several notches in a stick and tie the stick at both ends to hold up the reflector and allow angle adjustments.
OR
Bend a sturdy wire at both ends and glue corrugated cardboard strips to the lid and reflector as shown. The wire can be inserted into any of the corrugations for angle adjustment.
Add the black tray and “cook” the cooker. Put the black metal sheet inside the box. (The pots will sit on this light-absorbing sheet.) Put on the lid, with the lid reflector propped open, and aim the cooker toward the sun for several hours to drive out the last bit of moisture and any paint or glue fumes.
Cooking Directions
Put food in dark pots. Use with dark, tight-fitting lids.
Choose a cooking location. Set the cooker on a dry, level surface in direct sunshine away from potential shadows. For best results, solar cooking requires continuous, direct sunshine throughout the cooking period.
Put the pots in the cooker and replace the lid. Put the pots in cooker. If you’re cooking multiple dishes, quicker-cooking items should be placed toward the front of the cooker (opposite the reflector) and slower-cooking items toward the back, where access to sunlight is best. Place the lid on cooker.
Orient the cooker. Orient the cooker according to the details below. Once oriented, the cooker doesn’t need to be moved again during three to four hours of cooking. For longer cooking, or for large quantities of food, reorienting the cooker every couple of hours speeds cooking a little. Food cooks fastest when the shadow created by the cooker is directly behind it.
To cook a noontime meal orient the cooker so that the front side (opposite the reflector) faces easterly, or approximately where the sun will be midmorning. In general, it is good to get the food in early and not worry about it until mealtime. For most dishes you should start cooking by 9 or 10 am.
To cook an evening meal orient the cooker so that the front side faces westerly, or approximately where the sun will be midafternoon. For most dishes, it’s best to start cooking by 1 or 2 pm.
For all-day cooking orient the cooker toward where sun will be at noon or early afternoon. The food will be ready and waiting for the evening meal.
Adjust the reflector. With the adjustable prop, angle the reflector so that maximum sunlight shines on the pots.
Leave the food to cook for several hours or until done. There is no need to stir the food while it is cooking.
Remove the pots. Using pot holders, remove the pots from the cooker. (CAUTION: Pots get very hot.) If you won’t be eating for a couple of hours, you may want to leave the pots in the cooker and close the lid. The insulative properties of the cooker will keep the food warm for a while.
Enjoy!
Care and Storage
Store your cooker away from rain and animals, preferably indoors. Keep the glass clean.
Wednesday, April 8, 2009


Friday, March 20, 2009
What I've Learned About Applying to Grad School
 I thought I'd describe my foray into grad school applications - the frustrations, what I would have done differently, and how I got to where I am right now. Maybe it will help someone applying to a similar program, because I definitely went into it without knowing anything.
First off, I guess I should mention that I applied to school counseling programs at seven different schools-
- The University of Southern Maine (USM) in Gorham, ME
- The University of Vermont (UVM) in Burlington, VT
- UMass Amherst, in Amherst, MA
- Boston University (BU), in Boston, MA
- Syracuse University*, in Syracuse, NY
*I cancelled my Syracuse application pretty quickly, once I realized that there was
no chance of living there. - The University Maryland at College Park, in College Park, MD
- Marymount University, in Arlington, VA
I guess one of the main things I'd say is that you shouldn't hesitate to contact them. On several separate occasions, I had to take it upon myself to find out information that they weren't going to bother telling me. For instance-
- I had actually gotten through to the second (interview) round with Maryland, but they had been sending all my email to abschoen@HAMEELTEN.edu and I had never heard back from them (wtf!?) I had to fight with them on the phone for an hour to convince them that I had in fact applied to their program, and they needed to find my application and figure out what the hell was going on. Then - tada! - it turns out that I not only had applied, but was being asked to interview! Funny how Maryland is supposed to be the best counseling school in the country, but has given me the most grief...
- I just found out today that BU won't be making their decisions for at least a month, so going there is completely out of the question. I've already interviewed with and heard back from everyone else.
- Syracuse, Amherst, and Maryland were missing parts of my application after the due date, and had just considered my applications "incomplete". I hadn't realized that one of my recommendations had gotten held up in the mail, and would have been screwed had I not tried to call them.
Anyway, I realize this has gone much longer than most people are willing to read... I think my main advice for now is to check and double check your information as much as possible, because these schools aren't going out of their ways to help you out.
Tuesday, January 13, 2009
The Tangled Webs We Weave
 I had an interesting conversation with Brit a little while ago about careers, and how things are different for our generation compared to those before. For our parents, your education led to a career, which was a straight shot and unlikely to change after that. There were doctors and teachers and lawyers and accountants, and paths were unlikely to weave or overlap. For the baby boomer generation, it's a big deal to change careers, and doing so is almost looked down upon as a frivolous or impulsive decision - something that may happen with a mid-life crisis. To them, jobs all look like parallel train tracks. Once you get on a track, you have one destination, and it's hard as hell to change lines or divert your course. They simply don't cross - lawyers don't just decide to become doctors, and people don't go from teaching to accounting. To do so would mean having to metaphorically derail. Sure, there are some exceptions, but it just doesn't happen for the most part.
 I'm realizing that our generation is different, and our parents are concerned about it. Nowadays, there are many more shades of gray in jobs - for instance, Brit's current job straddles the line between politics and journalism, and I'm looking toward a career that combines psychology and education. And not only do these jobs combine different aspects, but they require us to bounce between different careers in the beginning, which seems to scare the shit out of our parents. They see it as instability or indecisiveness, but in reality, it may just be a strategic move. It wouldn't be at all unusual for me to take a job in teaching before I began work in counseling, and Brit is keeping her options open by considering future jobs in sports information directing or being involved with communications in a school.
 The fact is, we now have to look at jobs as more of complex, intertwining branches on a tree. To continue with the analogy for a second (bear with me), we now have the opportunity to grow, rather than chugging along on the same train tracks (pun intended). It's now ok to jump from one branch to another, and doing so will not derail your life, so to speak. It's becoming expected for our generation to do this in order to work our way up the ladder. I mean, look at Michael Bennet - he was the superintendent for Denver public schools, and was just chosen to replace Ken Salazar in the senate. That's a pretty big change of pace, and one that seems to be becoming more accepted.
I think that especially with the recession, our parents are freaked out about our decisions to change things up. After all, they look at this as being frivolous and picky in a time of serious financial hardship. But the thing is, we're going to be ok. We've got good educations under our belts, and even if they aren't exactly related to what we end up pursuing, it's alright. As Brit said to me yesterday, she may have gotten her degree in journalism and just started out, but it the boat is sinking, it's time to get off. We're all learning to roll with the punches in a changing job market and economy. And it might not always be a bad thing. After all, Brit was let go from her last job, but hit the ground running (or sprinting, some may say), getting a new, and perhaps better, job 10 days later.
So I guess my point is, don't look at changing career paths as indecision or immaturity - look at it as growth and change for the better. There are becoming more and more ways to get to where you want to go, giving us the opportunity to have lots of different experiences that may make us more well rounded and all-around more prepared for what life may throw at us.
[Thanks to James Cridland and Jus' fi for the railroad and tree pictures (respectively).]
Subscribe to:
Posts (Atom)

